When it comes to managing construction projects, staying on schedule is typically a hard thing to maintain. One of the biggest challenges faced by project managers is identifying and managing schedule delays. The window analysis technique is a valuable tool that can help project managers identify the causes of schedule delays and take corrective action to keep their projects on track. In this article, we will provide a comprehensive guide on using the window analysis technique to evaluate schedule delays in construction projects.
Table of Contents
What is the Window Analysis Technique?
The window analysis technique is a delay analysis method used to determine the causes of schedule delays and their impact on project timelines. It involves comparing the original project schedule with the updated schedule and identifying the differences. These differences are then analyzed to determine the causes of the delays.
Step-by-Step Guide to Using the Window Analysis Technique
Here we provide step by step guide to perform a good analysis for your delay, you can also scroll down for a more easy flow chart to understand te process easily.
Step 1: Identify the Critical Path
The critical path is the sequence of activities that determine the project’s completion date. To identify the critical path, you will need to create a project schedule that lists all of the project activities, their durations, and their dependencies.
Step 2: Establish the Baseline Schedule
The baseline schedule is the original project schedule that was agreed upon before any work began. It is important to establish the baseline schedule because it provides a reference point against which to measure any delays. The baseline schedule should include all of the project activities, their durations, and their dependencies.
If you don’t know what is a baseline schedule and want to know more about all types of schedules you may consider this article.
Step 3: Update the Schedule
The third step is to update the schedule. You will need to update the schedule to reflect any changes that have occurred since the baseline schedule was established. This will include changes to the project scope, changes to the project schedule, and any delays that have occurred.
Step 4: Perform the Window Analysis
The fourth step is to perform the window analysis. To perform the window analysis, you will need to compare the baseline schedule to the updated schedule and identify any differences. You will then need to break down the differences into individual delay events and assign each delay event to the responsible party.
Step 5: Calculate the Delay
The fifth step is to calculate the delay. To calculate the delay, you will need to determine the amount of time each delay event has added to the project schedule. You will also need to determine the impact that each delay event has had on the critical path.
Step 6: Determine the Cause of the Delay
The final step is to determine the cause of the delay. To determine the cause of the delay, you will need to analyze the delay events and identify their root causes. This can be done using a variety of tools, including interviews with project team members and review of project documentation.
Flow chart of how window analysis technique works
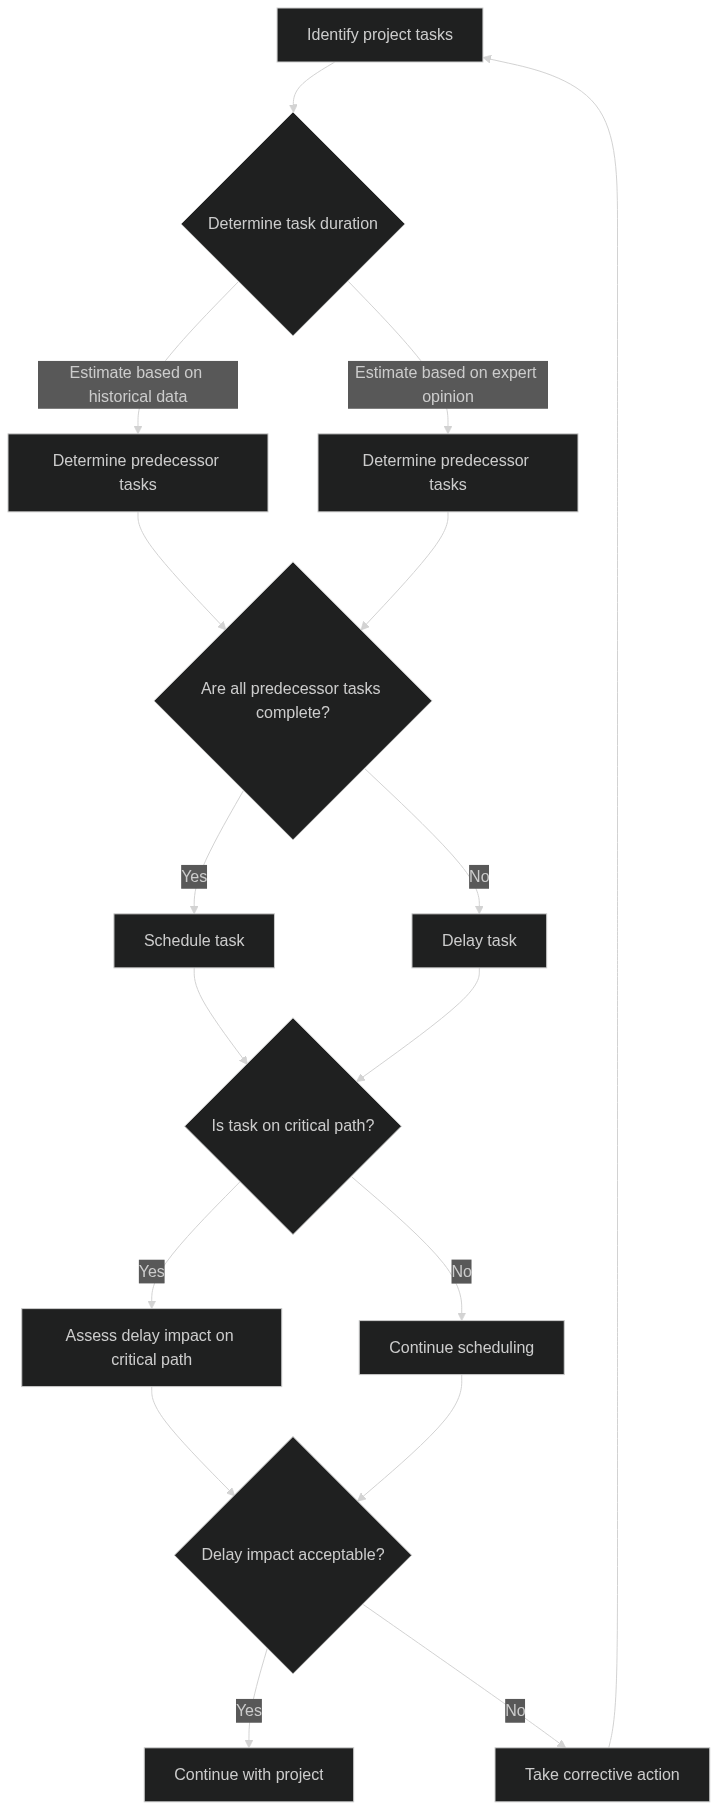
This mermaid graph visually represents the steps involved in using the window analysis technique to evaluate schedule delays in construction projects. The graph starts with identifying project tasks and then determining their duration based on historical data or expert opinion. The next step involves determining the predecessor tasks for each project task.
Once the predecessor tasks are identified, the graph branches off into two possible paths depending on whether or not all predecessor tasks are complete. If they are complete, the task is scheduled as planned. If they are not complete, the task is delayed.
The graph then checks if the delayed task is on the critical path, which is the sequence of tasks that determines the project’s overall duration. If it is on the critical path, the delay’s impact on the critical path is assessed. If the delay impact is acceptable, the project continues as planned. And if the delay impact is not acceptable, corrective action is taken, and the process starts again.
This mermaid graph provides a clear visual representation of the steps involved in using the window analysis technique.
This can help project stakeholders better understand how the technique works and how it can be used to evaluate schedule delays.
FAQ
Q: What are the benefits of using the window analysis technique?
A: The window analysis technique is a valuable tool for project managers because it helps identify the causes of schedule delays and their impact on project timelines. This allows project managers to take corrective action to keep their projects on track.
Q: How long does it take to perform a window analysis?
A: The time it takes to perform a window analysis will depend on the size and complexity of the project. In general, a window analysis can take anywhere from a few days to several weeks to complete.
Q: What happens if I assigned a delay activity to the wrong party?
A: If a delay event is assigned to the wrong party, it can lead to incorrect conclusions about the cause of the delay. It is important to carefully analyze each delay event and assign it to the correct party to ensure accurate results.
Conclusion
By following the step-by-step guide outlined in this article, you can successfully use the window analysis technique in your construction projects. This technique can be particularly useful for projects that involve multiple stakeholders, complex dependencies, and tight schedules.
By using the window analysis technique, you can identify the causes of delays, determine their impact, and take corrective action. This can ultimately help you save time and money, and deliver a successful project on time and within budget.
Remember that the window analysis technique is just one of many tools available to project managers for managing schedule delays. Other tools and techniques include critical path analysis, earned value management, and resource leveling. It is important to choose the right tool for the job, based on the specific needs and requirements of your project.
We hope this guide has been helpful in providing you with a comprehensive understanding of the window analysis technique. If you have any further questions or need assistance with your project, please don’t hesitate to reach out to us.
For more articles about delay analysis and other project management topics, check these articles :

